


How to Pack Bicycle Panniers Properly – A Complete Guide
How should you pack bicycle panniers properly? Learn where to place heavy gear, how to balance the load between both sides of the bicycle and which items to keep within easy reach. A practical guide to packing panniers for day rides, weekend trips and multi-day cycle tours.
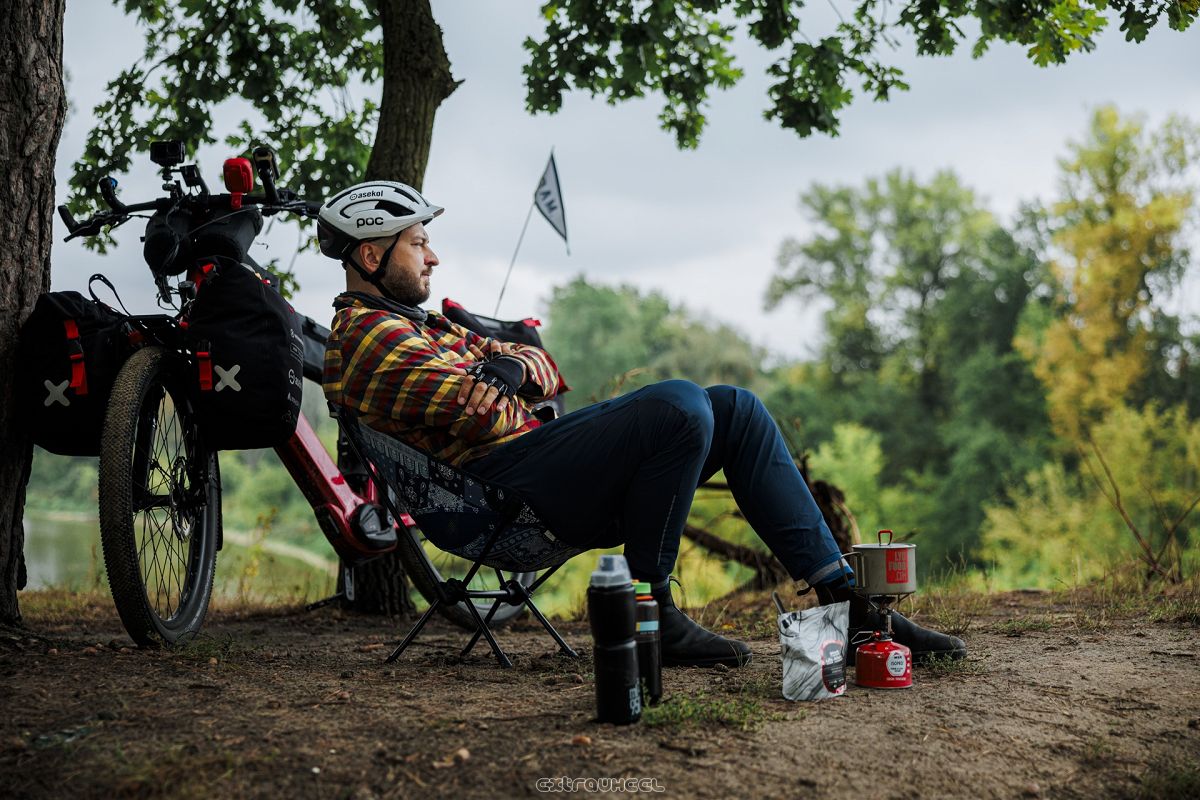
Correctly packing bicycle panniers has a direct effect on bike stability, riding comfort and access to your equipment. Even well-chosen panniers will not work at their best if heavy items are packed too high, most of the weight is concentrated on one side or essential gear is buried at the bottom.
This guide explains step by step how to pack bicycle panniers, where to place heavier equipment, how to distribute the load between the left and right sides and how to organise your luggage for a day ride, weekend trip or longer cycle tour.
Why does the way you pack bicycle panniers matter?
Choosing suitable panniers is important, but the way your equipment is distributed inside them matters just as much. Poorly distributed luggage can affect the bike when starting, braking, cornering and riding over uneven surfaces.
Poorly packed panniers can contribute to:
- reduced bicycle stability,
- greater side-to-side movement of the luggage and rack,
- less predictable handling in corners,
- more effort when pushing or lifting the bicycle,
- poor access to equipment needed during the ride.
Good packing is therefore not simply about using all the available capacity. Weight position, left-right balance, access to equipment and the stability of the complete luggage system all matter.
Where should the heaviest items go?
Keep heavy gear low
The basic principle is simple: place heavier items low and as close to the bicycle as practical. This helps keep the centre of mass of the loaded bicycle lower and can make its handling more predictable.
Heavier items may include:
- tools and spare parts,
- food supplies,
- a stove and cooking equipment,
- power banks and other heavier electronics,
- water.
This does not mean every heavy item must sit directly on the bottom of the pannier. What matters is avoiding a large concentration of weight high up and far away from the bicycle.
How should you balance the left and right sides?
Avoid a large difference in weight between panniers
A noticeable difference in weight between the left and right sides can be felt while riding, pushing or lifting the bicycle. With heavier loads, it is therefore worth distributing equipment between both panniers as evenly as practical.
A useful approach is to:
- pack both panniers in parallel instead of completely filling one first,
- divide heavy items between the left and right sides,
- check how the bicycle feels once fully loaded,
- adjust the load distribution before starting a longer ride.
The two sides do not need to have exactly the same weight. The aim is to avoid a substantial imbalance.
How should you organise your gear before packing?
Before putting equipment into the panniers, divide it into logical groups. This simple step makes packing easier and helps you find what you need while travelling.
A practical division might include:
- Sleeping equipment – tent, sleeping bag, mat and camping gear.
- Clothing – cycling clothing, spare clothes, underwear and warm layers.
- Food and cooking – food, stove, fuel and cookware.
- Tools and spares – multitool, pump, spare tube or repair kit and small parts.
- Electronics – chargers, power banks, cables and lights.
- Quick-access items – rain jacket, first-aid kit, documents and snacks.
Grouping your equipment also makes it easier to identify items that duplicate the same function. On longer trips, reducing unnecessary gear becomes increasingly valuable.
What should you pack in rear bicycle panniers?
Rear panniers normally provide most of the available luggage capacity, making them suitable for the main part of your touring equipment.
Heavier items are best carried lower down, while soft items can fill unused space and help reduce movement inside the pannier.
Example luggage distribution
Left rear pannier:
- tools and spare parts,
- stove and cooking equipment,
- part of your food supply.
Right rear pannier:
- spare clothing,
- sleeping bag,
- other lightweight and soft equipment.
This is only an example. There is no single correct layout for every cyclist. The weight of the items, how often you need them and the overall balance of the bicycle matter more than following a fixed pattern.
If you are still choosing your luggage system, read our guide on how to choose bicycle panniers. Pannier capacity should match the way you actually travel rather than simply the maximum amount of gear you could carry.
What should you pack in front panniers?
Front panniers can help distribute part of the luggage between the front and rear of the bicycle, but additional weight on the front wheel also affects steering.
Front panniers are therefore often best used for:
- lighter equipment,
- bulky but relatively light items,
- some clothing,
- camping equipment,
- food required during the day.
Avoid unnecessarily concentrating a large amount of weight high up or far from the front wheel. After changing your luggage setup, take a short test ride and check how the bicycle responds when steering and braking.
Whether you use front or rear panniers, check their position and mounting before setting off. Our guide explains in detail how to check whether bicycle panniers fit your bike rack.
Which items should remain easy to reach?
A common packing mistake is organising items only according to their size without considering when they will be needed.
Before closing your panniers, ask yourself three questions:
- What might I need while riding?
- What will I need during a short stop?
- Which items will only be needed at the end of the day?
A practical order of access
- At the top or easy to reach: rain jacket, warm layer, first-aid kit and snacks.
- In the middle: items used once or several times during the day.
- Deeper inside: sleeping equipment and spare items needed only after the riding stage is finished.
This avoids having to empty an entire pannier during a short stop.
How should you protect the contents of panniers from water?
Protecting your gear starts with an undamaged pannier that is closed correctly, but particularly sensitive items are worth protecting separately.
- Keep documents, phones and delicate electronics in suitable waterproof cases or containers.
- Separate wet clothing from dry equipment.
- Clothing and sleeping equipment can be organised in separate dry bags or packing bags.
- If a bag is intended to provide an additional barrier against water, check whether the manufacturer actually specifies it as waterproof.
A compression sack is not necessarily waterproof. Its primary purpose may simply be to reduce volume or organise equipment. Dry bags designed for the intended use can provide additional separation and protection during travel.
For a detailed explanation of the difference between rain protection and immersion, as well as the role of materials, welds, seams, roll-top closures and IP ratings, read our guide to what makes bicycle panniers waterproof.
Common mistakes when packing bicycle panniers
Problems often result not from one major mistake, but from several smaller issues occurring at the same time.
- Most of the weight on one side – may affect the balance of the bicycle.
- Heavy items packed high – raise the centre of mass of the loaded bicycle.
- No organisation system – makes equipment harder to find.
- Overfilled panniers – can prevent the closure from working correctly.
- Loose contents – may move around while riding.
- Poor access to essentials – forces you to unpack the pannier during short stops.
- Ignoring load limits – always consider the permitted load of the panniers, mounting system, rack and bicycle.
Once everything is packed, inspect the complete bicycle again. Check the mounting system and make sure no pannier, strap or loose item can reach the wheel, brakes or other moving components.
Packing panniers for different types of trip
The amount of luggage for a day ride, weekend trip and multi-week tour will be different. The principles of weight distribution remain similar, but organisation and access become increasingly important as the trip gets longer.
Day ride
You will usually need only emergency clothing, basic tools, food, drinks and personal items. There is no reason to fill all available pannier space simply because it is there.
Weekend trip
You may add spare clothing, sleeping equipment and basic camping gear. At this point, grouping items and keeping frequently used equipment accessible becomes particularly useful.
Long-distance cycle tour
The longer the trip, the more valuable a repeatable packing system becomes. Easy access and reducing unnecessary equipment also matter more. After a few days on the road, adjust your layout according to which items you use regularly and which remain untouched.
There is no single perfect packing system for every cyclist. A good system should be repeatable, logical and suited to your bicycle, equipment and style of travel.
FAQ – packing bicycle panniers
How should bicycle panniers be packed?
Keep heavier items low, distribute the load between both sides of the bicycle and organise equipment by purpose. Items you may need during the ride should remain easy to reach.
What should you put in rear bicycle panniers?
Rear panniers are suitable for most of the main luggage: tools, food, cooking equipment, clothing and sleeping gear. Heavier items should generally be carried lower down.
Do front panniers improve bicycle stability?
Front panniers can help distribute weight between the front and rear of the bicycle, but additional load on the front wheel also affects steering. The result depends on luggage weight and position as well as the design of the bicycle and rack.
How should you protect pannier contents from rain?
First, close the pannier according to the instructions for that model. Electronics and documents are worth protecting separately in suitable waterproof cases, while wet gear should be kept away from dry clothing and sleeping equipment.
Is a compression sack waterproof?
Not necessarily. A compression sack is primarily designed to reduce volume or organise equipment. If it is also expected to protect against water, check the manufacturer's specification for the particular product.
Which bicycle panniers are suitable for a long tour?
The right panniers depend on the amount of luggage, the length of the trip, the rack design and the way you travel. More capacity is not always better, so estimate the amount of equipment you actually carry and check that the mounting system is compatible with your bicycle.
How should you check your panniers before setting off?
Once packing is complete, close every pannier according to its instructions and check the mounting system and clearance from the wheel, brakes, cables and cranks. Lift and push the bicycle, then take a short test ride.
If the bicycle behaves differently from what you expect, stop and check the load distribution and pannier mounting. With a new luggage setup, inspect everything again after the first few kilometres.
Summary
Correctly packing bicycle panniers comes down to a few simple principles: keep heavier equipment low, avoid a large left-right imbalance, organise gear by purpose and keep frequently used items accessible.
The aim is not to create one perfect arrangement, but a system that remains safe, practical and repeatable from one day of the trip to the next. The more you travel with luggage, the easier it becomes to adapt the layout to your bicycle and your own style of touring.

 Polish
 German
 French